© All Rights Reserved Sandkuhl Clay Works, Inc. 2014-2016
Masonry Chimney Construction Guidelines
Masonry Chimney Foundation
An adequate concrete footing is required and must be able to support the weight of the chimney and/or fireplace. Check with local code to determine minimum requirements for all footings and reinforcements. Note: the chimney should not support any other parts of adjacent structures unless specifically designed to do so.Masonry Chimney Construction
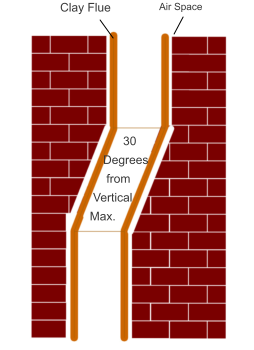
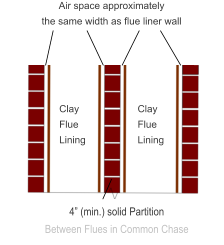
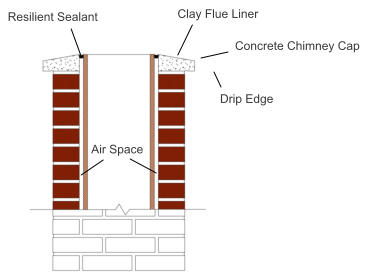
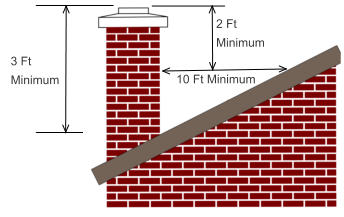
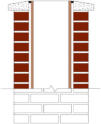
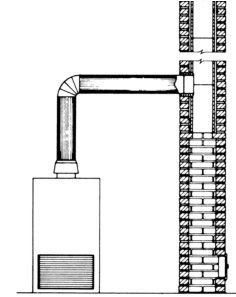
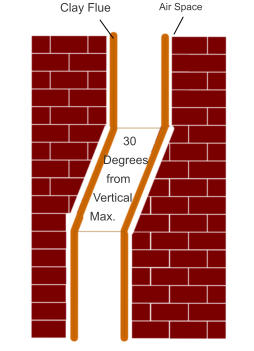
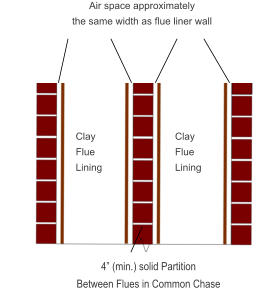
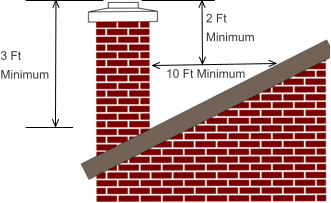
Materials used in masonry chimney construction include: •Flue Liners (ASTM Specification C 315) •Refractory Mortar (ASTM Test Method C 24 (cone 10) and Test Method C 199 (Medium Duty)) •Mortar (ASTM Specification C 270) •Concrete Block (ASTM Specification C 90 or C 129) •Fire Brick (ASTM Classification C 27) •Brick (ASTM Specification C 55 or C 216, Grade SW) •Natural Stone (ASTM Test Method C 170 or C 99) A chimney consists of the flue and the chimney wall. The Chimney wall must be a minimum of 4 inches of solid masonry completely surrounding the flue liner. The flue lining extends the entire length of the chimney. For fireplaces, the flue is constructed directly over the fireplace. For appliances, the flue starts no less than 8 inches below where the appliance hooks into the flue. Flue liners are installed by neatly embedding one on top of the other in non-water soluble refractory mortar using a 1/16 to 1/8 inch mortar joint. Please note, refractory mortar is required by code. Flue liners need to line up flush at the joints to form a smooth interior surface with no ledges or other obstructions where creosote and debris can accumulate. Remove all excess mortar from the interior of the flue liner. When constructing the chimney around the flue liner, an air space must be maintained between the chimney wall and the flue liner of not more than the thickness of the flue liner wall. The flue liner must be allowed to freely expand and contract and not be bonded to the surrounding masonry. A chimney may contain more than one flue. Under these conditions, the flues must be separated by 4 inch solid masonry partitions. If a flue must be angled or offset, the angle can be no more than 30 degrees from vertical. In an offset situation, the joints of the flue liners must be neat and flush forming a smooth interior surface free of excess mortar, ledges and other obstructions. When required, flue liners may be cut with a masonry saw. Appliances are attached to a chimney by way of a metal or clay thimble that is inserted into an appropriate sized hole into the side of the chimney flue. This hole may be prefabricated into the flue or carefully cut out of a flue. The connection thimble is inserted so that it is flush with the inside flue liner surface and does not protrude into the flue. Alternatively, the thimble may also butt flush against the outside of the flue. The thimble should slope slightly downward (1/4 inch per foot) towards the appliance to allow any creosote to run back to the appliance. The joint between the flue and thimble must be attached using refractory mortar. When attaching an appliance to a masonry chimney, be sure to follow the appliance manufacturer’s recommendations. All masonry chimneys must be terminated with a cap that is 2 inches thick (minimum), extending 1½ inches away from the chimney wall with a drip edge. All caps must be center reinforced with ½ inch (min) galvanized hardware cloth. The top slope of the cap should be 10 degrees away from the flue liner. This cap may be cast-in-place or pre-cast concrete. -IMPORTANT- The cap must be separated from the flue by a bond break and sealed with a resilient sealant. Polysulfide, butyl or urethane rubber caulking is recommended (avoid silicones). Oil based sealants do not hold up well. If the gap is large, non-flammable packing may be used to fill he space and then caulk the top to prevent water infiltration. This space between the flue and cap allows for expansion and contraction of the flue liner. Omitting this bond break by pouring the cap directly to the flue will cause the flue liner to break in service. It is important to periodically check the cap to flue seal to insure that there is no water penetrating the chimney. The termination of the flue liner should not extend above the cap by more that 4 inches. Typically the flue is terminated flush with the cap. The finished height of a chimney needs to be 3 feet above the highest point of the structure or 2 feet above any part of the structure within 10 feet of the chimney. Masonry chimneys constructed in seismic areas require special reinforcement and alternate construction techniques. Please refer to local building code requirements for applicable seismic requirements for masonry construction.Clearance to Combustibles
This is the air space that separates combustible materials (framing, trim, etc.) from the chimney and is a very important aspect of constructing a safe chimney. These clearances also apply to thimbles that connect an appliance to a chimney. For interior chimneys, a 2 inch minimum air space between the chimney and combustibles must be maintained. An interior chimney is defined as any chimney having 1 or more walls inside a structure. For exterior chimneys, a 1 inch minimum air space must be maintained between the chimney and combustibles. Combustible material shall be permitted to abut the masonry chimney walls, provided there is a minimum of 12 inches to the inside surface of the flue liner or in the case of a fireplace, 12 inches from the inside surface of the firebox. Please note that special rules apply to woodwork around fireplace openings (i.e. mantels). Combustible material within 12 inches of the fireplace opening shall not project more than 1/8 inch for each 1 inch distance from such opening.Sizing a Flue Liner for a Fireplace
To determine the proper flue size needed for a single faced fireplace with a 15 foot or higher chimney use the following formula: the interior cross sectional area of the flue required needs to be 1/10th of the area of the fireplace opening. For Example: A fireplace is to be constructed with a 36” wide by 30” tall interior face opening. The area of this opening is 1080 square inches (36 x 30). 10% of 1080 in2=108 in2. The flue liner required must have a minimum of 108 square inch cross-section. Therefore for a 36” by 30” fireplace, a 13x13 flue liner would be required.Chimney Care
It is recommended that chimneys be inspected annually by a certified professional chimney sweep to insure safe operation and the longevity of the chimney. For chimneys that are used continuously (masonry heaters and stoves), bi-annual cleaning and inspection may be necessary. Check with your certified professional. For more information contact the National Chimney Sweep Guild.

Manufacturer of Ceramic,
Structural Clay and
Refractory Products for
Construction, Agriculture,
Commercial and Industrial
Applications Since 1912.


© All Rights Reserved Sandkuhl Clay Works, Inc. 2014-2016
Masonry Chimney
Construction Guidelines
Masonry Chimney Foundation
An adequate concrete footing is required and must be able to support the weight of the chimney and/or fireplace. Check with local code to determine minimum requirements for all footings and reinforcements. Note: the chimney should not support any other parts of adjacent structures unless specifically designed to do so.Masonry Chimney
Construction
Materials used in masonry chimney construction include: •Flue Liners (ASTM Specification C 315) •Refractory Mortar (ASTM Test Method C 24 (cone 10) and Test Method C 199 (Medium Duty)) •Mortar (ASTM Specification C 270) •Concrete Block (ASTM Specification C 90 or C 129) •Fire Brick (ASTM Classification C 27) •Brick (ASTM Specification C 55 or C 216, Grade SW) •Natural Stone (ASTM Test Method C 170 or C 99) A chimney consists of the flue and the chimney wall. The Chimney wall must be a minimum of 4 inches of solid masonry completely surrounding the flue liner. The flue lining extends the entire length of the chimney. For fireplaces, the flue is constructed directly over the fireplace. For appliances, the flue starts no less than 8 inches below where the appliance hooks into the flue. Flue liners are installed by neatly embedding one on top of the other in non-water soluble refractory mortar using a 1/16 to 1/8 inch mortar joint. Please note, refractory mortar is required by code. Flue liners need to line up flush at the joints to form a smooth interior surface with no ledges or other obstructions where creosote and debris can accumulate. Remove all excess mortar from the interior of the flue liner. When constructing the chimney around the flue liner, an air space must be maintained between the chimney wall and the flue liner of not more than the thickness of the flue liner wall. The flue liner must be allowed to freely expand and contract and not be bonded to the surrounding masonry. A chimney may contain more than one flue. Under these conditions, the flues must be separated by 4 inch solid masonry partitions. If a flue must be angled or offset, the angle can be no more than 30 degrees from vertical. In an offset situation, the joints of the flue liners must be neat and flush forming a smooth interior surface free of excess mortar, ledges and other obstructions. When required, flue liners may be cut with a masonry saw. Appliances are attached to a chimney by way of a metal or clay thimble that is inserted into an appropriate sized hole into the side of the chimney flue. This hole may be prefabricated into the flue or carefully cut out of a flue. The connection thimble is inserted so that it is flush with the inside flue liner surface and does not protrude into the flue. Alternatively, the thimble may also butt flush against the outside of the flue. The thimble should slope slightly downward (1/4 inch per foot) towards the appliance to allow any creosote to run back to the appliance. The joint between the flue and thimble must be attached using refractory mortar. When attaching an appliance to a masonry chimney, be sure to follow the appliance manufacturer’s recommendations. All masonry chimneys must be terminated with a cap that is 2 inches thick (minimum), extending 1½ inches away from the chimney wall with a drip edge. All caps must be center reinforced with ½ inch (min) galvanized hardware cloth. The top slope of the cap should be 10 degrees away from the flue liner. This cap may be cast-in-place or pre-cast concrete. -IMPORTANT- The cap must be separated from the flue by a bond break and sealed with a resilient sealant. Polysulfide, butyl or urethane rubber caulking is recommended (avoid silicones). Oil based sealants do not hold up well. If the gap is large, non-flammable packing may be used to fill he space and then caulk the top to prevent water infiltration. This space between the flue and cap allows for expansion and contraction of the flue liner. Omitting this bond break by pouring the cap directly to the flue will cause the flue liner to break in service. It is important to periodically check the cap to flue seal to insure that there is no water penetrating the chimney. The termination of the flue liner should not extend above the cap by more that 4 inches. Typically the flue is terminated flush with the cap. The finished height of a chimney needs to be 3 feet above the highest point of the structure or 2 feet above any part of the structure within 10 feet of the chimney. Masonry chimneys constructed in seismic areas require special reinforcement and alternate construction techniques. Please refer to local building code requirements for applicable seismic requirements for masonry construction.Clearance to Combustibles
This is the air space that separates combustible materials (framing, trim, etc.) from the chimney and is a very important aspect of constructing a safe chimney. These clearances also apply to thimbles that connect an appliance to a chimney. For interior chimneys, a 2 inch minimum air space between the chimney and combustibles must be maintained. An interior chimney is defined as any chimney having 1 or more walls inside a structure. For exterior chimneys, a 1 inch minimum air space must be maintained between the chimney and combustibles. Combustible material shall be permitted to abut the masonry chimney walls, provided there is a minimum of 12 inches to the inside surface of the flue liner or in the case of a fireplace, 12 inches from the inside surface of the firebox. Please note that special rules apply to woodwork around fireplace openings (i.e. mantels). Combustible material within 12 inches of the fireplace opening shall not project more than 1/8 inch for each 1 inch distance from such opening.Sizing a Flue Liner for a Fireplace
To determine the proper flue size needed for a single faced fireplace with a 15 foot or higher chimney use the following formula: the interior cross sectional area of the flue required needs to be 1/10th of the area of the fireplace opening. For Example: A fireplace is to be constructed with a 36” wide by 30” tall interior face opening. The area of this opening is 1080 square inches (36 x 30). 10% of 1080 in2=108 in2. The flue liner required must have a minimum of 108 square inch cross-section. Therefore for a 36” by 30” fireplace, a 13x13 flue liner would be required.Chimney Care
It is recommended that chimneys be inspected annually by a certified professional chimney sweep to insure safe operation and the longevity of the chimney. For chimneys that are used continuously (masonry heaters and stoves), bi- annual cleaning and inspection may be necessary. Check with your certified professional. For more information contact the National Chimney Sweep Guild.

Manufacturer of
Ceramic, Structural
Clay and Refractory
Products Since
1912.